前面把算法在仿真环境都跑通过后,决定拿雷达在真实世界跑一下。先介绍一下最近又发现的两个巨牛的算法:Point-Lio与Faster-lio。
Point-Lio部署
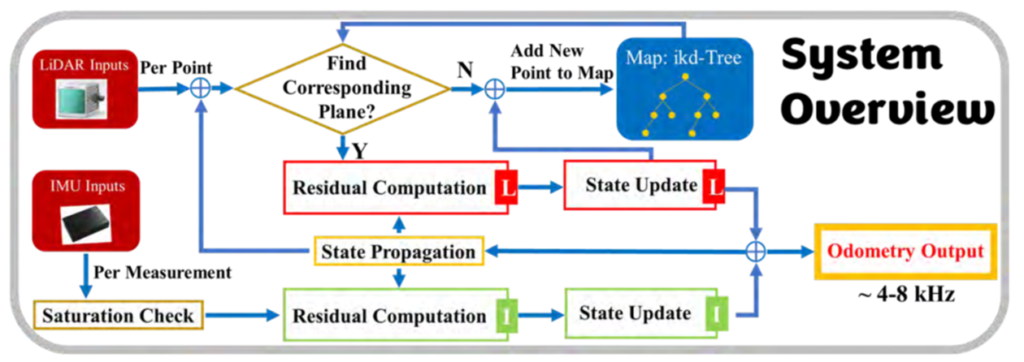
Point-Lio是一种鲁棒且高带宽的LIO算法,具备在极端剧烈运动条件下稳定估计的能力,能够提供准确的、高频的里程计测量(4-8 kHz),可应对严重振动和高角速度或线速度的情况。但对算力的要求较高、CPU负载较大。
先安装livox_ros_driver ,单独创一个工作空间,或者和Point-Lio一个工作空间也行。这里新建一个工作空间:
mkdir -p livox_ros_driver_ws/src #-p  代表递归创建文件夹
cd livox_ros_driver_ws/src
git clone https://github.com/Livox-SDK/livox_ros_driver.git
cd ..
catkin_make
然后安装Point-Lio
mkdir -p Point_Lio_ws/src
cd Point_Lio_ws/src
git clone https://github.com/hku-mars/Point-LIO.git
cd Point-LIO
git submodule update --init
cd ../..
编译前先source一下livox_ros_driver的工作空间(如果point-lio的src下有livox_ros_driver则省去此步骤)
source /home/leo/livox_ros_driver_ws/devel/setup.bash然后编译
catkin_make由于官方只对avia等固态激光雷达做了启动文件的适配,并没有对mid360雷达做适配,但我们可以将avia的启动文件中的一些雷达参数改为mid360的参数,主要就是线数、IMU外参这些。以下是我在src/config文件夹下增加的mid360.yaml文件配置:
common:
    lid_topic:  "/livox/lidar"
    imu_topic:  "/livox/imu"
    con_frame: false # true: if you need to combine several LiDAR frames into one
    con_frame_num: 1 # the number of frames combined
    cut_frame: false # true: if you need to cut one LiDAR frame into several subframes
    cut_frame_time_interval: 0.1 # should be integral fraction of 1 / LiDAR frequency
    time_lag_imu_to_lidar: 0.0 # Time offset between LiDAR and IMU calibrated by other algorithms, e.g., LI-Init (find in Readme)
                               # the timesample of IMU is transferred from the current timeline to LiDAR's timeline by subtracting this value

preprocess:
    lidar_type: 1
    scan_line: 4
    timestamp_unit: 1           # the unit of time/t field in the PointCloud2 rostopic: 0-second, 1-milisecond, 2-microsecond, 3-nanosecond.
    blind: 0.5

mapping:
    imu_en: true
    start_in_aggressive_motion: false # if true, a preknown gravity should be provided in following gravity_init
    extrinsic_est_en: false # for aggressive motion, set this variable false
    imu_time_inte: 0.005 # = 1 / frequency of IMU
    satu_acc: 3.0 # the saturation value of IMU's acceleration. not related to the units
    satu_gyro: 35 # the saturation value of IMU's angular velocity. not related to the units
    acc_norm: 1.0 # 1.0 for g as unit, 9.81 for m/s^2 as unit of the IMU's acceleration
    lidar_meas_cov: 0.001 # 0.001; 0.01
    acc_cov_output: 500
    gyr_cov_output: 1000
    b_acc_cov: 0.0001
    b_gyr_cov: 0.0001
    imu_meas_acc_cov: 0.1 #0.1 # 0.1
    imu_meas_omg_cov: 0.1 #0.01 # 0.1
    gyr_cov_input: 0.01 # for IMU as input model
    acc_cov_input: 0.1 # for IMU as input model
    plane_thr: 0.1 # 0.05, the threshold for plane criteria, the smaller, the flatter a plane
    match_s: 81
    fov_degree: 360
    det_range: 100
    gravity_align: true # true to align the z axis of world frame with the direction of gravity, and the gravity direction should be specified below
    gravity: [0.0, 0.0, -9.810] # [0.0, 9.810, 0.0] # gravity to be aligned
    gravity_init: [0.0, 0.0, -9.810] # [0.0, 9.810, 0.0] # # preknown gravity in the first IMU body frame, use when imu_en is false or start from a non-stationary state
    extrinsic_T: [ -0.011, -0.02329, 0.04412 ]
    extrinsic_R: [ 1, 0, 0,
                   0, 1, 0,
                   0, 0, 1 ]

odometry:
    publish_odometry_without_downsample: false

publish:
    path_en: true                 # false: close the path output
    scan_publish_en: true         # false: close all the point cloud output
    scan_bodyframe_pub_en: false  # true: output the point cloud scans in IMU-body-frame

pcd_save:
    pcd_save_en: false
    interval: -1                 # how many LiDAR frames saved in each pcd file;
                                 # -1 : all frames will be saved in ONE pcd file, may lead to memory crash when having too much frames.
之后在src/launch文件夹下增加mapping_mid360.launch文件:
<launch>
<!-- Launch file for Livox AVIA LiDAR -->

	<arg name="rviz" default="true" />

	<node pkg="point_lio" type="pointlio_mapping" name="laserMapping" output="screen">
	<rosparam command="load" file="$(find point_lio)/config/mid360.yaml" />
	<param name="use_imu_as_input" type="bool" value="1"/> <!--change to 1 to use IMU as input of Point-LIO-->
	<param name="prop_at_freq_of_imu" type="bool" value="1"/>
	<param name="check_satu" type="bool" value="1"/>
	<param name="init_map_size" type="int" value="10"/>
	<param name="point_filter_num" type="int" value="1"/> <!--4, 3-->
	<param name="space_down_sample" type="bool" value="1" />
	<param name="filter_size_surf" type="double" value="0.3" /> <!--0.5, 0.3, 0.2, 0.15, 0.1-->
	<param name="filter_size_map" type="double" value="0.2" /> <!--0.5, 0.3, 0.15, 0.1-->
	<param name="cube_side_length" type="double" value="2000" /> <!--1000-->
	<param name="runtime_pos_log_enable" type="bool" value="0" /> <!--1-->
	</node>
	<group if="$(arg rviz)">
	<node launch-prefix="nice" pkg="rviz" type="rviz" name="rviz" args="-d $(find point_lio)/rviz_cfg/loam_livox.rviz" />
	</group>

	launch-prefix="gdb -ex run --args"

</launch>
然后就可以启动Point-Lio算法了:
source devel/setup.bash
roslaunch point_lio mapping_mid360.launch
Faster-Lio部署
Faster-Lio是一种基于增量体素的激光惯性里程计的方法,是Fast-Lio2 的基础上发表的工作。优点是流程短、计算快,扫描频率高可快速跟踪旋转。缺点也是对算力要求略高。
编译的时候会出现寻找livox_ros_driver驱动的过程,如果之前已经单独安装过,或在其他工作空间安装过,那就耐心等待编译过程寻找就行,不用手动结束编译(实在不行就source一下livox_ros_driver的工作空间)。
mkdir -p faster_lio_ws/src
cd faster_lio_ws/src
git clone https://github.com/gaoxiang12/faster-lio.git
cd ..
catkin_make
同样的在src/config文件夹下增加的mid360.yaml文件配置:
common:
  lid_topic: "/livox/lidar"
  imu_topic: "/livox/imu"
  time_sync_en: false         # ONLY turn on when external time synchronization is really not possible

preprocess:
  lidar_type: 1                # 1 for Livox serials LiDAR, 2 for Velodyne LiDAR, 3 for ouster LiDAR,
  scan_line: 4
  blind: 0.5
  time_scale: 1e-3

mapping:
  acc_cov: 0.1
  gyr_cov: 0.1
  b_acc_cov: 0.0001
  b_gyr_cov: 0.0001
  fov_degree: 360
  det_range: 100.0
  extrinsic_est_en: false      # true: enable the online estimation of IMU-LiDAR extrinsic
  extrinsic_T: [ -0.011, -0.02329, 0.04412  ]
  extrinsic_R: [ 1, 0, 0,
                 0, 1, 0,
                 0, 0, 1 ]

publish:
  path_publish_en: false
  scan_publish_en: true       # false: close all the point cloud output
  scan_effect_pub_en: true    # true: publish the pointscloud of effect point
  dense_publish_en: false       # false: low down the points number in a global-frame point clouds scan.
  scan_bodyframe_pub_en: true  # true: output the point cloud scans in IMU-body-frame

path_save_en: true                 # 保存轨迹,用于精度计算和比较

pcd_save:
  pcd_save_en: true
  interval: -1                 # how many LiDAR frames saved in each pcd file;
  # -1 : all frames will be saved in ONE pcd file, may lead to memory crash when having too much frames.

feature_extract_enable: false
point_filter_num: 3
max_iteration: 3
filter_size_surf: 0.5
filter_size_map: 0.5             # 暂时未用到,代码中为0, 即倾向于将降采样后的scan中的所有点加入map
cube_side_length: 1000

ivox_grid_resolution: 0.5        # default=0.2
ivox_nearby_type: 18             # 6, 18, 26
esti_plane_threshold: 0.1        # default=0.1
在src/launch文件夹下增加mapping_mid360.launch:
<launch>
<!-- Launch file for Livox AVIA LiDAR -->

	<arg name="rviz" default="true" />

	<rosparam command="load" file="$(find faster_lio)/config/mid360.yaml" />

	<param name="feature_extract_enable" type="bool" value="0"/>
	<param name="point_filter_num_" type="int" value="3"/>
	<param name="max_iteration" type="int" value="3" />
	<param name="filter_size_surf" type="double" value="0.5" />
	<param name="filter_size_map" type="double" value="0.5" />
	<param name="cube_side_length" type="double" value="1000" />
	<param name="runtime_pos_log_enable" type="bool" value="1" />
    <node pkg="faster_lio" type="run_mapping_online" name="laserMapping" output="screen" />

	<group if="$(arg rviz)">
	<node launch-prefix="nice" pkg="rviz" type="rviz" name="rviz" args="-d $(find faster_lio)/rviz_cfg/loam_livox.rviz" />
	</group>

</launch>
之后就可以启动Faster-Lio了:
source devel/setup.bash
roslaunch faster_lio mapping_mid360.launch
实物扫描楼层测试
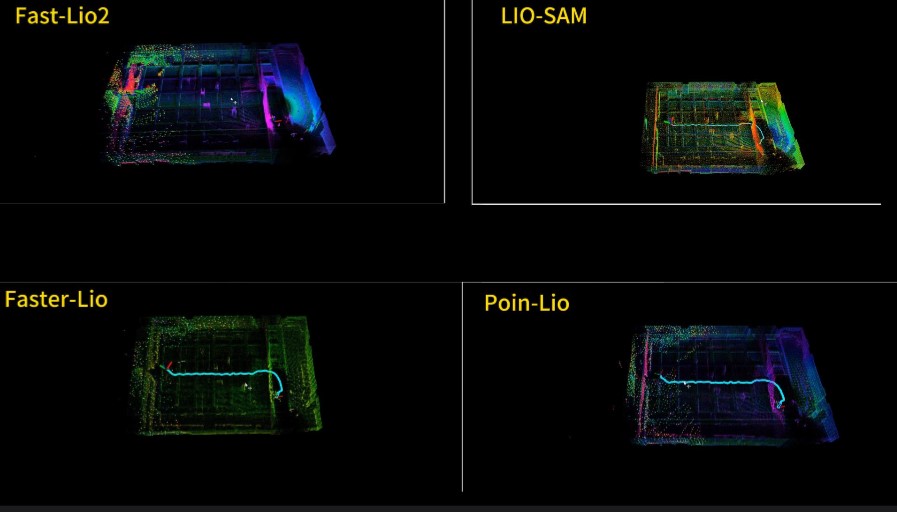
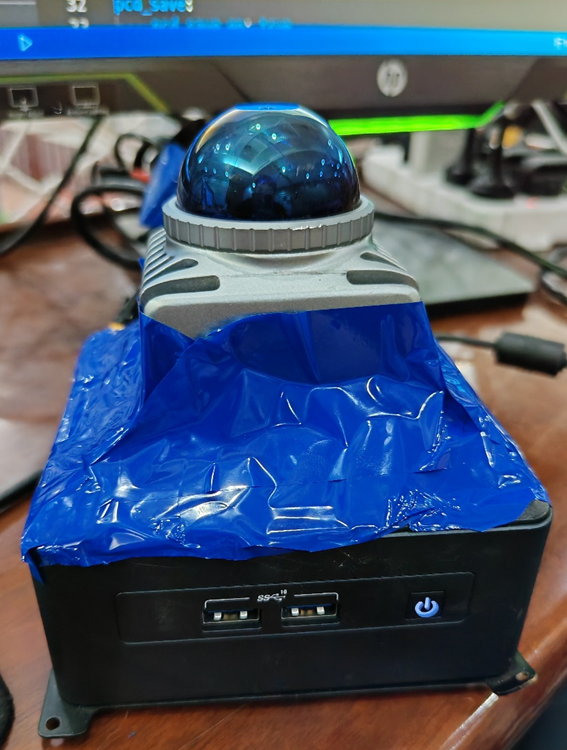
将所有算法移植到NUC上,配置好环境并编译完成后,手持NUC与MID360激光雷达在北京某高层十三楼与十二楼环绕一圈。
最后附上对比视频,从效果上看Faster-Lio的定位建图最准确。


博主你好,我用作者提供的velodyne的ulhk数据集跑的faster_lio,为什么rviz显示 no tf data?不知道哪里的问题,用avia的数据集能跑
我没用Velodyne跑过诶,可以看一下tf树看看是不是和你avia数据集跑的一样
现在已经好了,就是话题前面/ 没对上,谢谢
faster-lio 不用 livox_ros_driver2?
都行应该
博主,您好,你用的NUC是那个型号的?
英特尔NUC,CPU好像是I5-1340p?
大佬 ,就是我的点云数据没有ring和time,pointlio可以正常使用吗
什么意思,不是标准Pointcloud格式或者livox雷达的格式吗
嗯嗯,雷达数据格式不是标准的,现在已经转换成功了。感谢大佬回复🫣
faster-lio 用 livox_ros_driver2 为什么运行建图后点云图像会跑飞?
跑飞有很多原因,IMU准不准,标定了没,算力够不够,坐标系对不对等等